
Activity – Excel 2: Using autofill
Autofill
AutoFill is a feature in Excel to help quickly enter certain data, such as consecutive numbers, dates, days of the week, or items that follow a specific pattern.
-
- Start a new Excel workbook.
- Type AutoFill in cell A1.
- Click the File tab and then Save As to save the spreadsheet as Your Name TEP021 Excel 2 in the Documents folder on your computer.
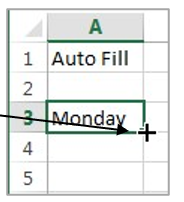
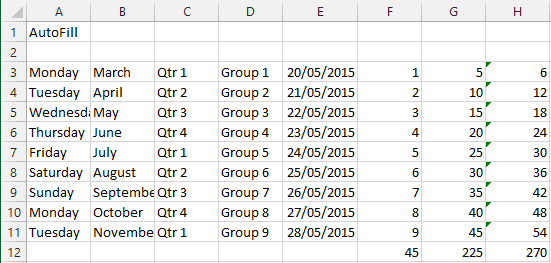
Let’s use AutoFill to enter a series of dates, times, weekdays, months, years, or number patterns. - Type Monday in cell A3 and press the Enter key.
- Click A3, then move the mouse pointer onto the little square (Fill Handle) at the lower-right corner of the cell until the pointer changes to a black cross, +.
6. When the mouse pointer becomes a solid black cross, click and drag down to A11, then release the mouse button. The weekdays are automatically entered!
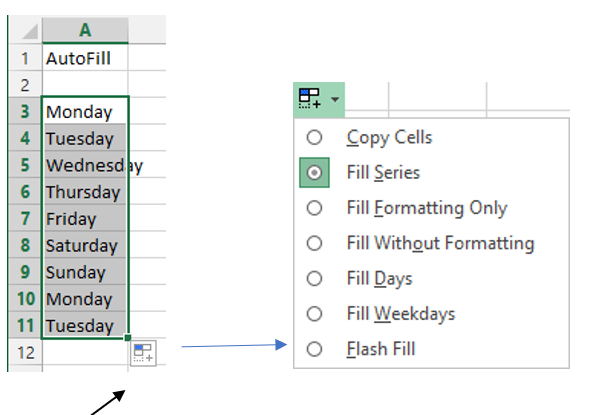
7. Click the Auto Fill Options icon and try the options of Copy Cells, Fill Days and Fill Weekdays. Compare the results of different options.
You can select a range of cells and Autofill multiple series in one go.
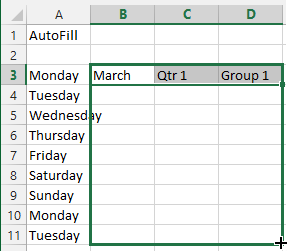
8. Type March, Qtr 1 and Group 1 in cell B3, C3 and D3 respectively.
9. Select B3:D3 and then click and drag the Fill Handle down to D11.
Notice that the numbers for Qtr 1 in Column C repeat the cycle of 1 to 4, whereas the numbers for Group in Column D continue to increase.
10. Type 20/05/2015 in cell E3 and press the Enter key.
11. Click E3 and drag the Fill Handle down to E11.
12. Click the Auto Fill Options icon and try the options of Fill Days, Fill Weekdays, Fill Months and Fill Years.

Compare the results of different options.
13. Type 1 in F3 and 2 in F4.
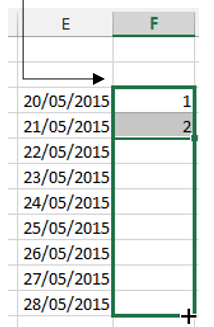
14. Select F3:F4 and drag the Fill Handle down to F11.
15. Click the AutoFill Options icon and try the option of Copy Cells. Compare the results of different options.
You can specify the fill pattern by entering the first two or more values and using them as starting cells. Excel examines the values in the starting cells and determines the pattern and then AutoFill using the pattern. For example, if you want to fill the cells with a series of numbers, such as 2, 4, 6, 8…, type 2 and 4 in the two starting cells, and then drag the fill handle.
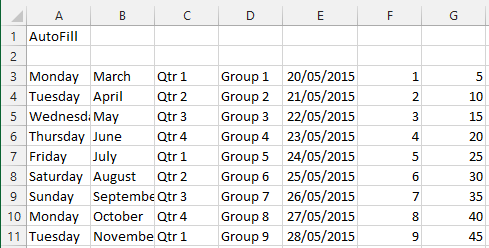
16. Type 5 in G3 and 10 in G4.
17. Select G3:G4 and drag the Fill Handle down to G11.
18. Save your work.
AutoSum
AutoSum allows you to add up a column or row of numbers without entering any formula.
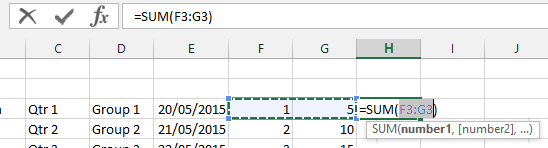
- Click in cell H3.
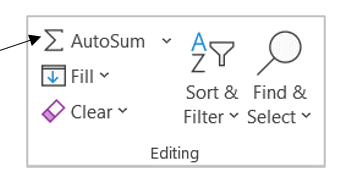
- Click AutoSum.
3. AutoSum determines the desired cell range by examining the data and then enters a formula in both the cell and in the Formula Bar.
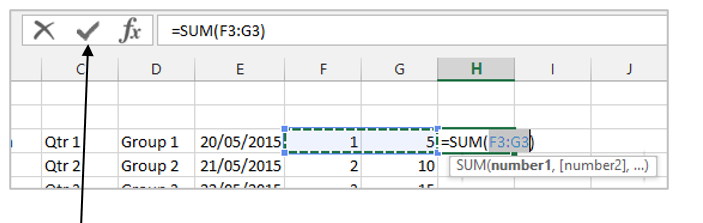
4. Click the tick or press the Enter key to complete the formula.
 If the automatically selected range does not contain all the numbers that you want for calculation, you can adjust it by dragging the sizing handles on each corner of the border.
5. Click H3 and drag the Fill Handle down to H11 to auto fill the formula.
6. Click F12 and then click the AutoSum.
7. Press Enter key to complete the formula.
8. Click F12 and drag the Fill Handle to H12.
9. Add a header with your name and student number on the left and the date on the right.
10. Add a footer with the unit code and activity name and number on the left, and a page number on the right
11. Save and close your workbook.
12. Upload the completed activity document to the TEP021 Activities folder on OneDrive.